I started this blog so my daughters could find all of our family favourite recipes in one place. It has actually grown into more than just the family favourites but also other recipes we've tried out in our kitchen. I don't like to fill up the post with alot of chatter. Sometimes there's a little story to tell, but usually I like to get right to the point. So this is for them, but hope you find some recipes that you like as well. I'll be sharing a lot of recipes, and along the way you'll find some crafty things and maybe some helpful hints too! Welcome!


Showing posts with label no bake. Show all posts

Saturday, July 12, 2025

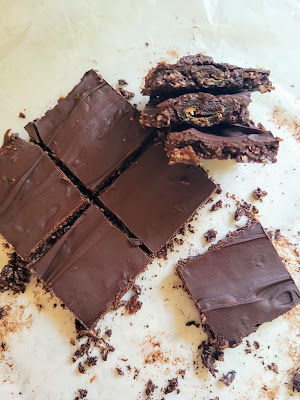
Date Coconut Bark

No bake (practically no guilt) sweet treat.

14 pitted dates

1 cup unsweetened shredded coconut

2 tbsps virgin coconut oil (solid at room temperature)

1 tsp vanilla

1/4 cup cocoa powder

2 tbsps maple syrup

2 oz (about 1/3 cup) dark chocolate chips 

Place the everything except the chocolate chips in a food processor and whirl until crumbly. You might like to keep some of the dates chunky or whirl until everything is completely chopped. Line an 8 X 8" pan with wax paper then press the mixture firmly into the pan. Refrigerate of 30 minutes. Melt the chocolate in the microwave in 20 second intervals until almost melted. Stir to complete the melting then pour over the date mixture. Smooth out and refrigerate until the chocolate is set.  To cut, warm a serrated knife under hot water then wipe dry and make a cut. Repeat for all cuts so the chocolate doesn't crack. Store in the refrigerator, but it won't last long!

Makes 16 squares
Follow hotandcoldrunningmom on Pinterest. You can scan the pincode seen here with your phone if you're on a desktop. If you're on a phone just screenshot it, go to the Pinterest app, click camera. Then instead of taking a pic use the option to use one of your photos. Click on the screenshot you just took and go right to my Pinterest profile where you can follow me 🙂


Tuesday, June 10, 2025

No Bake 8 Minute Cheesecake Pie

Creamy, dreamy light as a feather cheesecake pie. Just right for those hot summer nights when you really don't want to put the oven on. And it has Greek yogurt in it to make you feel like you are eating something good for you!

Ingredients:

1 - 8 oz (250g) pkg cream cheese, at room temperature

1/3 cup sugar

1 cup vanilla Greek yogurt

2 tsps vanilla extract

2 1/2 cups Cool Whip, plus more for topping

1 - 8" graham crumb pie crust

Start by beating the cream cheese until smooth, then add the sugar and whisk in the yogurt and vanilla. Fold in the Cool Whip and spoon into the prepared pie crust. You can make your own graham crust but the pre-made ones make this recipe easy as, well... "pie"! Chill the pie for at least 4 hours or you can freeze it for up to 2 months. Just defrost in the fridge overnight. Then spread more Cool Whip on top and add berries or a dusting of cocoa powder. Serves 8

Follow hotandcoldrunningmom on Pinterest. You can scan the pincode seen here with your phone if you're on a desktop. If you're on a phone just screenshot it, go to the Pinterest app, click camera. Then instead of taking a pic use the option to use one of your photos. Click on the screenshot you just took and go right to my Pinterest profile where you can follow me 🙂


Wednesday, January 1, 2025

Frozen Eggnog Pie

This light and creamy no-bake dessert will hit the spot for any eggnog lover! Originally the recipe I tried said to chill not freeze the pie which resulted in a soupy concoction. So make this one ahead of time, pop it in the freezer and serve frozen.

Ingredients:

1 ready-made graham crumb pie crust

1 - 153g (6 serving size) instant vanilla pudding mix

1 1/2 cups eggnog

2 cups Cool Whip

1/2 tsp ground nutmeg, divided

Whip eggnog and pudding mix together for 2 minutes then fold in the Cool Whip and 1/4 tsp nutmeg.

Pour into prepared crust and sprinkle the remaining nutmeg on top. Cover and freeze a minimum of 5 hours.

When ready to eat, cut from frozen and serve topped with whipped cream or more Cool Whip.
Serves 8

Follow hotandcoldrunningmom on Pinterest. You can scan the pincode seen here with your phone if you're on a desktop. If you're on a phone just screenshot it, go to the Pinterest app, click camera. Then instead of taking a pic use the option to use one of your photos. Click on the screenshot you just took and go right to my Pinterest profile where you can follow me 🙂


Sunday, June 30, 2024

Biscoff No Bake Cheesecake

Indulge in this rich cheesecake slice of heaven highlighted with flavours of caramel, ginger and cinnamon. This no bake dessert comes together in about 20 minutes, then needs to rest in the refrigerator a few hours before serving. I'm sure someone with piping skills (not me!) could turn this into a real beauty!  

Ingredients:

3/4 cup cream cheese at room temperature

3 1/4 tbsps sugar

1 1/2 tsps vanilla extract

2 tbsps instant vanilla pudding powder

2 cups heavy cream

2 - 250g packages Biscoff cookies

strawberries


Garnish:

1/2 - 1 cup Biscoff spread

more cookies and strawberries

Mix the cream cheese, sugar, vanilla and pudding powder together for 1 minute or until smooth. Add whipping cream gradually whipping on medium high until firm, about 1 minute. Set aside.

Lay plastic wrap on a pan or flat serving tray. Place 3 rows of 7 cookies each on the plastic. Spread about 1/3 of the filling over the cookies, then make a row of strawberries down the middle with a row of cookies on each side of the berries.

Spread another layer of filling over everything. Using the plastic lift the two cookie sides up to meet in the middle forming a triangle. Press firmly.
Spread the remaining filling over everything and refrigerate at least 4 hours or overnight.
Carefully lift the cake to remove the plastic and place directly on serving tray or cake board. Heat the Biscoff spread on low in microwave only a few seconds then drizzle or pipe onto the cake and garnish with strawberries and cookies.
 
Serves 6-8

 Adapted from a post from merirasoi2024 on Instagram

Follow hotandcoldrunningmom on Pinterest. You can scan the pincode seen here with your phone if you're on a desktop. If you're on a phone just screenshot it, go to the Pinterest app, click camera. Then instead of taking a pic use the option to use one of your photos. Click on the screenshot you just took and go right to my Pinterest profile where you can follow me 🙂

Saturday, December 16, 2023

Newfoundland Coconut Snowballs

These no bake little nuggets are a Newfoundland Christmas treat. Since my great grandmother was a Newfoundlander I felt I should give these a look see! Keep them in the freezer or fridge. And if you are the type that wants your treat like now then these are for you because you can eat them straight from the freezer!

These are similar to but not the same as Hairy Moose Farts. You'll find the link to that recipe at the end of this post!

Ingredients:
1 1/2 cups graham cracker crumbs
3/4 cup oats
1 cup + 1 1/2 cups shredded, unsweetened coconut
1/3 cup cocoa powder
1 tsp salt
1/3 cup butter, melted
1 can sweetened condensed milk
1 tsp vanilla, coconut or almond extract
1 package large marshmallows

Mix the graham crumbs, oats, 1 cup coconut, cocoa powder and salt together in a large bowl. In another bowl combine the melted butter, condensed milk and extract of your choice, then pour the wet ingredients into the large bowl of dry ingredients and mix to combine.
Have a small bowl of water ready. You will need to wet your hands to handle the dough. Place 1 1/2 cups of coconut into another shallow bowl. Take a heaping tablespoon of dough and flatten it in the palm of your hand. Now take a marshmallow and wrap it in the dough. Roll into a ball then into the coconut to coat.
Place the snowballs on a lined cookie sheet and freeze for 2 hours. After 2 hours take a sharp knife and slice the snowballs in half.
This recipe makes 13 snowballs/26 halves.
Store in an airtight container in the refrigerator or freezer and if you're not into eating them frozen just defrost for about 20 minutes.
Here's that other Newfoundland sweet:

Follow hotandcoldrunningmom on Pinterest. You can scan the pincode seen here with your phone if you're on a desktop. If you're on a phone just screenshot it, go to the Pinterest app, click camera. Then instead of taking a pic use the option to use one of your photos. Click on the screenshot you just took and go right to my Pinterest profile where you can follow me 🙂


Monday, April 10, 2023

Chocolate Chow Mein Nests

Made it through the ice storm that took out our electricity for 4 days! Luckily we had a campstove and BBQ for cooking and could whip up these no-bake cookies for Easter.


Ingredients:
300 g (about 10 oz) chocolate chips 
2 cups dry chow mein noodles 
a handful of peanuts or cashews
Cadbury mini eggs

Ideally, melt the chocolate chips in a bowl in the microwave or in a double boiler. (Or very gently in a pot on a propane campstove). Whichever method you choose, heat on low to medium temperature until almost completely melted. Remove from heat and stir until smooth and every bit has melted.
Dump the chow mein noodles and melted chocolate into a large bowl and stir to coat. Throw in a handful of nuts and stir some more.
Take large spoonfuls and drop onto a parchment lined cookie sheet. Sprinkle with chocolate mini eggs then allow to set. If the fridge isn't out because of a power failure pop the tray in there for a quick set.
Boom, done!

Makes 8-10 large cookie nests
Follow hotandcoldrunningmom on Pinterest. You can scan the pincode seen here with your phone if you're on a desktop. If you're on a phone just screenshot it, go to the Pinterest app, click camera. Then instead of taking a pic use the option to use one of your photos. Click on the screenshot you just took and go right to my Pinterest profile where you can follow me 🙂


Sunday, July 3, 2022

Lemon Blueberry Ice Cream Sandwiches

Easy homemade ice cream sandwiches ... you need these in your life ASAP! Perfect for a hot summer day!


Ingredients:
36 graham cracker squares
8 oz (236 ml) Cool Whip whipped topping
12 oz (3 X 100g single serving cups) lemon yogurt
zest of 1/2 a lemon
1 cup frozen blueberries
1/2 cup blueberry jam

In a large bowl fold the Cool Whip, yogurt and lemon zest together. Rinse the blueberries in a colander until the water runs clear, then pat dry with a paper towel. In a small bowl mix the blueberries and jam together and gently swirl into the whipped topping mixture. Resist the urge to over stir. I used my Blueberry Jam with Lavender Infusion here. If you're interested, here is the link to the recipe:
https://hotandcoldrunningmom.blogspot.com/2021/07/blueberry-jam-with-lavender-infusion.html

Lay plastic wrap in a 13 X 9" pan with plenty of overhang, enough to cover everything when done. Lay half the graham squares in the bottom of the pan. If you need to cut them to fit use a serrated knife. Spread the creamy mixture evenly over the squares.

Top with the rest of the graham crackers.

And wrap with plastic wrap.

Freezer for 6 hours, then lift out of the pan, unwrap and cut into squares.

Individually wrap and return to the freezer until ready to serve. Keeps well for 2-3 weeks. 
Makes 15 full squares with a few 1/2 squares too! (They're the testers!)

Adapted from: midwesternhomelife.com

Follow hotandcoldrunningmom on Pinterest. You can scan the pincode seen here with your phone if you're on a desktop. If you're on a phone just screenshot it, go to the Pinterest app, click camera. Then instead of taking a pic use the option to use one of your photos. Click on the screenshot you just took and go right to my Pinterest profile where you can follow me 🙂


Monday, December 27, 2021

Chocolate Berry Trifle

With juicy fresh berries, chocolate cake and decadent eggnog mascarpone filling this trifle is sure to be a hit with your guests! And because it's a no-bake, make-ahead dessert it'll be a hit with you too!


Ingredients:
2 - 12 oz chocolate (store bought) cake rolls, chilled
3.4 oz pkg instant vanilla pudding mix
1 1/4 cups eggnog
1 1/2 cups whipping cream
1/3 cup icing sugar
8 oz mascarpone cheese
Zest of 1 or 2 oranges
2 tsps vanilla
3 tbsps seedless raspberry jam
2 1/2 cups raspberries
1 1/2 cups sliced strawberries
plus more berries to garnish
more whipped cream to top or aerosol whipped cream (optional)

Have the cake rolls chilling in the fridge, or they could even be frozen. Whisk the pudding mix and eggnog together for 1 minute, then refrigerate. Whip the whipping cream and icing sugar together on high for 2 minutes or until thickened, and refrigerate. Next beat the mascarpone and add the pudding/eggnog mix. Beat until smooth then add the orange zest and vanilla. Fold in half the whipped cream/icing sugar mix.
Melt the jam in the microwave... it'll only take a few seconds, then mix with the berries.

Assembly:
Cut the cake with a sharp knife in 1/2" slices, wiping off the knife after each cut. Place one or two slices in the bottom of a 4 quart size bowl and stand more around the sides. Add about 1/2 the filling to the bowl.

Fill with the berry mixture. Stand more cake slices around the sides and put a couple on top of the berries too. Now spoon on the remaining filling.

Top with the remaining whipped cream making sure all of the cake slices are covered. Cover the bowl with plastic wrap and refrigerate. This can be made up to this point 1-2 days ahead of time.

When ready to serve garnish with more whipped cream and berries. Dig in with a large spoon and serve in bowls.

Serves 10 - 12
Find more Hot and Cold Running Mom on Pinterest


Monday, November 8, 2021

No Bake Biscuit Cake

This not-too-sweet chocolate no bake biscuit cake is incredibly delicious, a cinch to make and you may already have all the ingredients  in your pantry!


Ingredients:
325 g or 11 oz (about 2 2/3 sleeves) Maria biscuits or any digestive cookie or graham cracker
1/4 cup chopped walnuts (optional)
1/2 cup sugar
1/4 cup unsweetened cocoa
1/2 cup cold water
1/3 cup butter 
1 tsp vanilla 

Whisk the sugar, cocoa powder, cold water and butter together in a saucepan. Bring to a boil on medium heat then simmer for 7 minutes, stirring regularly. Remove from heat.
Toast the chopped walnuts in a pan 2-4 minutes then add to the chocolate mixture along with the vanilla.
Break up the cookies into a large bowl. I like the pieces bigger as you can see, but you may break the cookies into small pieces as you prefer. Pour the chocolate mixture in and toss together with two big spoons to completely coat the cookies. It may look dry by that's ok. This bowl pictured wasn't big enough, I had to transfer everything to a larger bowl to have room to mix well.


Line the bottom of you choice of pans with parchment paper. I used 2 - 5" springform pans, but you could use an 8 or 9" pan or even a loaf pan. Spoon the mixture into the pans, pressing into place.

Refrigerate overnight before cutting to serve. That will give the cookies enough time to absorb moisture from the chocolate syrup.


Very good plain, but everything is better with whipped cream!


Store in refrigerator.
Wrapped well this biscuit cake may be frozen then thawed in refrigerator when needed. 
Makes about 10 servings