I started this blog so my daughters could find all of our family favourite recipes in one place. It has actually grown into more than just the family favourites but also other recipes we've tried out in our kitchen. I don't like to fill up the post with alot of chatter. Sometimes there's a little story to tell, but usually I like to get right to the point. So this is for them, but hope you find some recipes that you like as well. I'll be sharing a lot of recipes, and along the way you'll find some crafty things and maybe some helpful hints too! Welcome!


Showing posts with label cake. Show all posts

Thursday, September 11, 2025

Buttery Mandarin Upside Down Muffins

Buttery, dense vanilla muffin topped with a bright and juicy slice of mandarin to start the day.

Ingredients:

1 1/4 tbsps butter

8 tsps brown sugar

5 mandarins

2 cups flour

1 1/4 tsps baking powder

1/2 tsp salt

1 cup sugar

1/4 cup brown sugar

1 1/4 cups butter, at room temperature 

1 tsp vanilla

4 eggs

1/3 cup vanilla Greek yogurt 

Spray oil into 15 muffin cups. Divide the 1 1/4 tbsps of butter with a dab in each cup then add approximately 1/2 a tsp brown sugar to each. Peel and cut the mandarins into 3 slices and sit on top of brown sugar and butter cut side up. Whisk the flour, baking power and salt together and set aside. Cream the sugar, brown sugar and butter together then add the vanilla, eggs and Greek yogurt. Add dry ingredients to wet in 3 additions and mix just until combined. Scoop batter into muffin cups then bake at 350°F for 25-30 minutes or until a cake tester comes out clean. Let cool 2-3 minute then gently give each cake a turn in it's place. Let cool another 2-3 minutes then place a rack over the pan and flip over to release the cupcakes. Makes 15
Follow hotandcoldrunningmom on Pinterest. You can scan the pincode seen here with your phone if you're on a desktop. If you're on a phone just screenshot it, go to the Pinterest app, click camera. Then instead of taking a pic use the option to use one of your photos. Click on the screenshot you just took and go right to my Pinterest profile where you can follow me 🙂


Friday, July 25, 2025

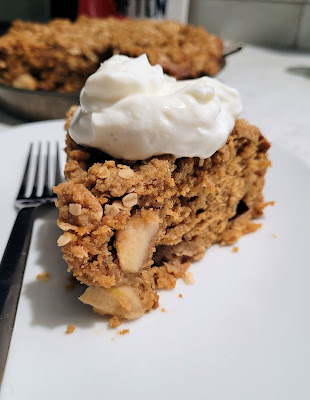
Apple Cottage Cheese Cake

Moist and tender cake with a crunchy, crumble top, juicy apples, warming spices and the added richness of cottage cheese. A simple dessert that is not too sweet so you can even have it for breakfast. 

Ingredients:

1 1/2 cups flour

1 1/2 tsps baking powder

1/4 tsp allspice

1/4 tsp cinnamon

1/4 tsp ginger

1/4 tsp salt

3/4 cup brown sugar

1/3 cup coconut oil

2 tbsps molasses

2 eggs

1/2 cup cottage cheese

1/4 cup milk

2 tsps lemon juice

1 1/2 cups peeled and diced apple

1/2 cup raisins or dried cranberries (optional)


Crunch top: 

1/4 cup flour

1/4 cup brown sugar

1/2 tsp cinnamon

2 tbsps oats

3 tbsps butter, melted

Preheat oven to 350°F then oil and flour a 9" round cake pan. Set aside. Whisk the flour, baking powder, spices and salt together. In another bowl beat the brown sugar and coconut oil together, then add the molasses and eggs. In a blender process the cottage and milk until smooth and add that to the wet ingredients along with the lemon juice. Add the dry ingredients to the wet in 2 or 3 additions and mix just until combined. Fold in the apples, and if using, the raisins. Spoon into the prepared pan. Stir the dry crunch topping ingredients together then add the melted butter and mix until crumbly. Sprinkle over top. Bake at 350°F for 35-40 minutes or until a cake tester comes out clean. Cool at least 15 minutes before slicing. Add a dollop of whipped cream or Greek yogurt. Serves 8 

Adapted from: gooddinnermom.com 

Follow hotandcoldrunningmom on Pinterest. You can scan the pincode seen here with your phone if you're on a desktop. If you're on a phone just screenshot it, go to the Pinterest app, click camera. Then instead of taking a pic use the option to use one of your photos. Click on the screenshot you just took and go right to my Pinterest profile where you can follow me 🙂


Sunday, April 27, 2025

Easy Pineapple Upside Down Cake

They say everything old is new again and this retro dessert is proof of that! Classics never go out of style! Buttery cake, sweet caramelly fruit topping made easy using a cake mix. They'll be coming back for seconds!

Ingredients:

1 yellow cake mix

1 small box instant vanilla pudding

4 eggs, at room temperature

1/2 cup pineapple juice (reserved from canned pineapple rings)

1/2 cup milk

1/2 cup vegetable oil

2 tsps vanilla


Topping:

1 cup brown sugar

1/4 cup butter, melted

12 canned pineapple rings

12 maraschino cherries

Spray 2 - 8" round baking pans with cooking oil. Melt butter and pour into prepared pans, then sprinkle with brown sugar. Blot the pineapple and cherries with paper towels to avoid the cake becoming soggy. Arrange the fruit on the bottom of the pans. Mix the cake mix, vanilla pudding powder, eggs, pineapple juice, milk, vegetable oil and vanilla together on medium speed for 2 minutes. Pour or ladle the batter over the pineapple and cherries.
Bake at 350°F for 38-42 minutes or until a cake tester comes out clean. Cool in pans 10 minutes then lay a plate on top and invert. Leave the pan on the cake for 2-3 minutes letting the glaze release from the pan. Then remove the pan to see the beauty that is your Pineapple Upside Down Cake!

If you want to serve one and freeze one no problem. Once completely cooled simply cover with plastic wrap then foil and freeze 2-3 months. Defrost in fridge overnight.

Two cakes serve 12-14


Follow hotandcoldrunningmom on Pinterest. You can scan the pincode seen here with your phone if you're on a desktop. If you're on a phone just screenshot it, go to the Pinterest app, click camera. Then instead of taking a pic use the option to use one of your photos. Click on the screenshot you just took and go right to my Pinterest profile where you can follow me 🙂

Friday, April 18, 2025

A & P Spanish Bar Cake

Feeling nostalgic with this one. Does anyone remember the old A & P grocery store that sold these Spanish Cake Bars years ago, spiced and loaded with raisins? Perfect with a cup of their Eight O'Clock coffee!

Ingredients:

1 cup all purpose flour

1 cup whole wheat flour

3/4 cup sugar

3/4 cup brown sugar

1 1/2 tsps baking soda

2 tbsps cocoa powder

2 tsps cinnamon

1/2 tsp salt

1 tsp nutmeg

1 1/2 tsps allspice

1/2 cup avocado or vegetable oil

2 cups unsweetened applesauce

2 eggs

1 1/2 cups raisins


Frosting:

1/2 cup butter

5 cups icing sugar

2 tsps vanilla

1/4 cup milk

First plump up the raisins. Cover them with hot water for 15 minutes then drain off the water and set aside. Next mix the flours, sugars, baking soda, cocoa and spices together. Add the oil, applesauce, eggs and then the raisins. Spray a 13 X 9" baking pan with oil and line with parchment paper. Pour the batter in and bake at 350°F for 30-35 minutes. Let cool 15-20 minutes then turn out on a rack, remove parchment and cool completely. Make the frosting by creaming the butter then add the icing sugar in 4 or 5 additions. Add the vanilla and milk and beat until smooth. For a traditional Spanish Bar cake cut the cake lengthwise and frost in 2 layers making fork lines across the top. Or just frost the top of the 13 X 9" cake as a single layer slab cake.
Serves 10-12

Follow hotandcoldrunningmom on Pinterest. You can scan the pincode seen here with your phone if you're on a desktop. If you're on a phone just screenshot it, go to the Pinterest app, click camera. Then instead of taking a pic use the option to use one of your photos. Click on the screenshot you just took and go right to my Pinterest profile where you can follow me 🙂


Sunday, April 13, 2025

Whipped Vanilla Frosting

This homemade frosting is super creamy and fluffy. Use it to frost a layer cake or pipe on top of cupcakes.

Ingredients:

1 cup unsalted room temperature butter

3 1/4 cups icing sugar, sifted

1/3 cup 35% whipping cream

2 tsps vanilla extract

pinch of salt

Whisk the butter in a mixer on high 3-5 minutes until creamy. Then on medium speed add the icing sugar in 2 or 3 additions and beat until fully mixed in. Then add the cream, vanilla and salt and whip on high for a full 5 minutes. This is how it looks after 5 minutes with a whisk attachment. If you want to get rid of the bubbles and have a more smooth frosting use the flat spatula attachment for 2 more minutes.

Makes enough frosting for a 2 layer 8" cake.

You might also like my Fluffy Whipped Chocolate Frosting:

https://www.hotandcoldrunningmom.ca/2025/03/fluffy-whipped-chocolate-frosting.html 


Follow hotandcoldrunningmom on Pinterest. You can scan the pincode seen here with your phone if you're on a desktop. If you're on a phone just screenshot it, go to the Pinterest app, click camera. Then instead of taking a pic use the option to use one of your photos. Click on the screenshot you just took and go right to my Pinterest profile where you can follow me 🙂

Tuesday, March 11, 2025

Clementine Cashew Cake

Here's a bright dessert that's flourless and fabulous! And the perfect use of less than perfect clementines. If you've got some getting a little soft bake this up right now or pop the clementines into the freezer whole for later use (like I did).

Ingredients:

200g (4 small, 7 oz) clementines, fresh or frozen

4 eggs

120g (4 oz) sugar

175g (6 oz) ground cashews

1 tsp baking powder

Cook the clementines in the microwave in a covered dish with a little water on high for 8-10 minutes. Then drain off the water and let cool. Cut in half and remove any pips. Place everything else (yes even the peel) in a food processor and pulse to a pulp. Add the remaining ingredients to the food processor and mix together for 20-30 seconds. Oil and flour a 1.5L (6" X 6" X 2") baking dish, pour the batter in and bake at 375°F for 40-45 minutes or until a cake tester comes out clean. Cool on rack.

Makes 8 servings


Follow hotandcoldrunningmom on Pinterest. You can scan the pincode seen here with your phone if you're on a desktop. If you're on a phone just screenshot it, go to the Pinterest app, click camera. Then instead of taking a pic use the option to use one of your photos. Click on the screenshot you just took and go right to my Pinterest profile where you can follow me 🙂


Sunday, October 20, 2024

Green Tomato Snack Cake

Did your fall garden clean out leave you with a bunch of green tomatoes? This green tomato snack cake is similar to carrot cake so it goes well with cream cheese frosting. But frosting is just an option as it is moist and spicy on it's own.

Ingredients:

1 cup whole wheat flour

1/2 cup all purpose flour

1/2 tsp salt

1/2 tsp baking powder

1/2 tsp baking soda

1/2 tsp cinnamon

1/2 tsp allspice

3/4 cup brown sugar

1/4 cup vegetable oil

1/4 cup applesauce

2 eggs

1 tsp vanilla

1/2 cup chopped walnuts

1/2 cup raisins or dried cranberries

1 1/4 cups diced green tomatoes

Combine the whole wheat flour, all purpose flour, salt, baking powder, baking soda, cinnamon and allspice. Set aside.

In a separate bowl, mix the brown sugar, vegetable oil, applesauce, eggs and vanilla together. Next mix the dry ingredients into the wet and stir to combine.

Fold in the walnuts, raisins and green tomatoes and spoon into an 8 X 8" baking pan that has been sprayed with oil and lined on the bottom with parchment paper.

Bake at 350° for 40-45 minutes. A cake tester should come out clean when it's done.

Makes 9 servings

If you still have a load of green tomatoes try this sweet relish:

https://www.hotandcoldrunningmom.ca/2015/10/green-tomato-sweet-relish.html 


Follow hotandcoldrunningmom on Pinterest. You can scan the pincode seen here with your phone if you're on a desktop. If you're on a phone just screenshot it, go to the Pinterest app, click camera. Then instead of taking a pic use the option to use one of your photos. Click on the screenshot you just took and go right to my Pinterest profile where you can follow me 🙂


Thursday, August 8, 2024

Loaded Apple Custard Cake

Luscious layers of apple packed densely in a bread pudding like custard and baked to golden perfection!

Ingredients:

3 eggs

2/3 cup warm milk

3 tbsps butter, melted

1 tsp vanilla

1/4 cup all purpose flour

1/4 cup oat flour

1/2 cup icing sugar

1-2 tsps cinnamon

1 tsp baking powder

pinch of salt

2 lbs (about 4 large apples) peeled and sliced thin with mandolin

Prepare the apples and line a 9 X 5" loaf pan with parchment paper.

Whisk the eggs, warm milk, melted butter and vanilla together.

Mix the flours, sugar, cinnamon, baking powder and salt together then add to the wet ingredients. Mix well then add the apples to the batter and combine to coat the slices.

Spoon into the prepared pan, laying the apple slices flat as you go. Pour any remaining batter on top.

Bake at 350°F for 55-60 minutes or until a cake tester comes out clean.

Cool 30 minutes on rack then, using the parchment, carefully lift the cake out of the pan, remove the paper and cool completely on rack before slicing. In fact, a chilled custard cake will slice very cleanly.
Serves 8

Adapted from: hungryhappens.net

Follow hotandcoldrunningmom on Pinterest. You can scan the pincode seen here with your phone if you're on a desktop. If you're on a phone just screenshot it, go to the Pinterest app, click camera. Then instead of taking a pic use the option to use one of your photos. Click on the screenshot you just took and go right to my Pinterest profile where you can follow me 🙂


Friday, August 2, 2024

Healthier Date Walnut Cake

Don't sleep on this one! It uses only whole wheat flour and no refined sugar making this super moist cake an easy  and delicious choice.

Ingredients:

25 pitted dates

1 1/2 cups hot milk

1/2 cup vegetable oil

1 cup whole wheat flour

1/2 tsp baking powder

1 tsp baking soda

1 tsp vanilla

1/2 cup chopped walnuts

sprinkle of cinnamon

First soak the dates in hot milk for 1 hour.

Whisk the whole wheat flour, baking powder and baking soda together. Set aside.

Purée the dates and milk in a blender or food processor then add the oil and vanilla. Stir in the dry ingredients.

Pour batter into a parchment lined and oiled 6" springform pan. Top with chopped walnuts and sprinkle with cinnamon.

Bake at 350°F for 50-55 minutes or until a cake tester comes out clean. Cool completely before removing the ring and paper.  

Serves 6-8

Adapted from: iamtarneet

Follow hotandcoldrunningmom on Pinterest. You can scan the pincode seen here with your phone if you're on a desktop. If you're on a phone just screenshot it, go to the Pinterest app, click camera. Then instead of taking a pic use the option to use one of your photos. Click on the screenshot you just took and go right to my Pinterest profile where you can follow me 🙂


Sunday, June 30, 2024

Biscoff No Bake Cheesecake

Indulge in this rich cheesecake slice of heaven highlighted with flavours of caramel, ginger and cinnamon. This no bake dessert comes together in about 20 minutes, then needs to rest in the refrigerator a few hours before serving. I'm sure someone with piping skills (not me!) could turn this into a real beauty!  

Ingredients:

3/4 cup cream cheese at room temperature

3 1/4 tbsps sugar

1 1/2 tsps vanilla extract

2 tbsps instant vanilla pudding powder

2 cups heavy cream

2 - 250g packages Biscoff cookies

strawberries


Garnish:

1/2 - 1 cup Biscoff spread

more cookies and strawberries

Mix the cream cheese, sugar, vanilla and pudding powder together for 1 minute or until smooth. Add whipping cream gradually whipping on medium high until firm, about 1 minute. Set aside.

Lay plastic wrap on a pan or flat serving tray. Place 3 rows of 7 cookies each on the plastic. Spread about 1/3 of the filling over the cookies, then make a row of strawberries down the middle with a row of cookies on each side of the berries.

Spread another layer of filling over everything. Using the plastic lift the two cookie sides up to meet in the middle forming a triangle. Press firmly.
Spread the remaining filling over everything and refrigerate at least 4 hours or overnight.
Carefully lift the cake to remove the plastic and place directly on serving tray or cake board. Heat the Biscoff spread on low in microwave only a few seconds then drizzle or pipe onto the cake and garnish with strawberries and cookies.
 
Serves 6-8

 Adapted from a post from merirasoi2024 on Instagram

Follow hotandcoldrunningmom on Pinterest. You can scan the pincode seen here with your phone if you're on a desktop. If you're on a phone just screenshot it, go to the Pinterest app, click camera. Then instead of taking a pic use the option to use one of your photos. Click on the screenshot you just took and go right to my Pinterest profile where you can follow me 🙂